
Introduction: Why IoT Startups Fail Without an MVP
The Internet of Things (IoT) market is projected to exceed $650 billion by 2026, yet 90% of IoT startups fail within the first two years. The primary culprit? Building products nobody wants, burning through capital on over-engineered solutions, and skipping validation.
Unlike software startups that can pivot overnight, IoT companies face unique constraints: hardware lead times, certification requirements, and complex integration between physical devices and digital systems. This is why IoT MVP development isn’t just recommended—it’s survival-critical.
An MVP (Minimum Viable Product) in IoT is a functional prototype that solves one core problem for early adopters, using the simplest possible technology stack. It’s your hypothesis tester, your investor magnet, and your reality check—all rolled into one affordable package.
Before diving deep, understand how MVP fits into the broader journey. Check out our guide on the complete IoT product development roadmap to see where you are in the process.
What Makes IoT MVP Unique?
IoT MVP development differs fundamentally from pure software MVPs due to three inherent complexities:
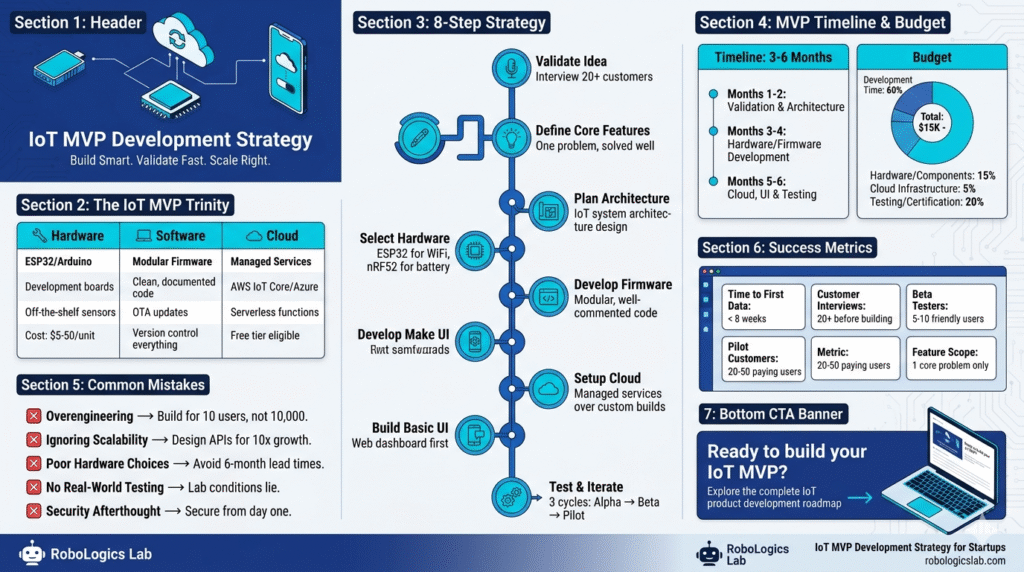
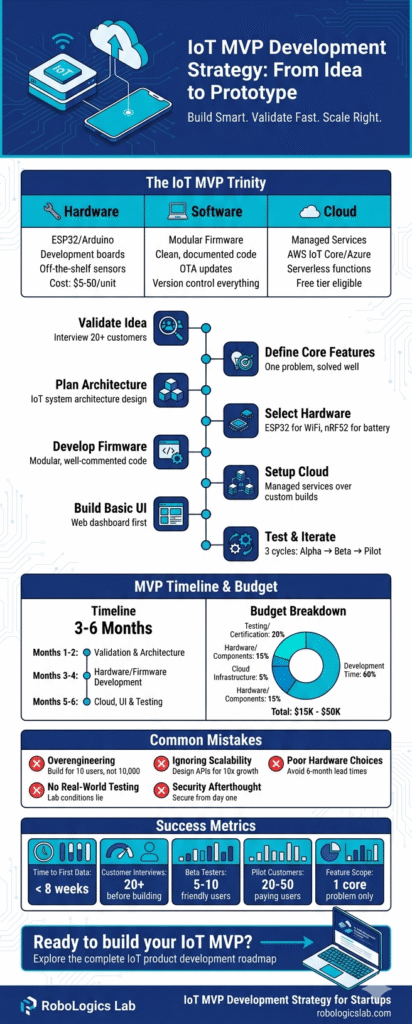
1. The Hardware-Software-Cloud Trinity
While a SaaS MVP might only need a landing page and database, an IoT MVP requires synchronized coordination across:
- Physical hardware (sensors, actuators, microcontrollers)
- Embedded firmware (device logic and connectivity)
- Cloud infrastructure (data processing, storage, APIs)
- User interfaces (mobile apps or dashboards)
2. Cost and Iteration Challenges
Changing a line of code costs nothing. Changing a PCB design costs thousands and weeks of delays. Hardware decisions in the MVP phase create technical debt that can sink a startup if not managed strategically.
3. Real-World Variables
IoT devices operate in unpredictable physical environments—interference, temperature extremes, power fluctuations. Your MVP must survive the real world, not just the lab.
Understanding the distinct IoT hardware vs software vs cloud roles early helps you allocate resources efficiently across these domains.
MVP in the IoT Development Journey
Your MVP sits at the intersection of ideation and execution. It’s the first time your concept meets reality, but it shouldn’t be the first time you’ve thought about architecture.
Smart founders map their MVP within the larger IoT product lifecycle, understanding that today’s prototype decisions impact tomorrow’s manufacturing scalability. The goal isn’t just to build something that works—it’s to build something that can evolve.
Step-by-Step IoT MVP Development Strategy
Step 1: Idea Validation Before Hardware
Don’t build what you can validate with conversations.
- Interview 20+ potential customers
- Identify the “hair-on-fire” problem (not just “nice-to-have”)
- Validate willingness to pay through letters of intent or pre-orders
- Map the user journey without technology first
Example: A smart agriculture startup discovered farmers cared more about soil moisture alerts than the automated irrigation they initially planned. This pivot saved six months of development.
Step 2: Define Core Features Only (Avoid Feature Creep)
Your MVP should solve one problem exceptionally well. Use the MoSCoW method:
- Must have: Essential functionality for core value proposition
- Should have: Important but not launch-blocking
- Could have: Nice additions for v2
- Won’t have: Everything else (write these down to resist temptation)
Rule of thumb: If removing a feature doesn’t break the core value proposition, remove it.
Step 3: IoT System Architecture Planning
Before touching hardware, design your IoT system architecture design. Define:
- Data flow from sensor to cloud to user
- Communication protocols (WiFi, LoRa, Bluetooth, Cellular)
- Security requirements from day one
- Scalability considerations (even if you’re starting small)
A well-architected MVP prevents costly rewrites when you scale from 10 devices to 10,000.
Step 4: Hardware Selection for MVP
Choose development boards over custom PCBs.Table
| Use Case | Recommended Hardware | Why |
|---|---|---|
| WiFi-enabled prototypes | ESP32 | $5-10, built-in wireless, massive community |
| Low-power sensors | Arduino + shields | Plug-and-play, extensive libraries |
| Industrial applications | Raspberry Pi 4 | Linux-based, handles edge computing |
| Battery-operated devices | ESP32-S2 or nRF52 | Ultra-low power modes |
MVP Hardware Principles:
- Use off-the-shelf modules (avoid custom fabrication)
- Prioritize development speed over optimization
- Ensure easy programming and debugging access
- Document everything for future reference
Step 5: Firmware Development
Keep firmware modular and well-commented. Even MVP code should follow production standards:
// Example: Modular sensor reading with error handling
void readSensorData() {
    float temperature = dht.readTemperature();
    if (isnan(temperature)) {
        logError("Sensor read failed");
        return;
    }
    sendToCloud(temperature);
}
Key practices:
- Implement over-the-air (OTA) update capability early
- Use established libraries (don’t reinvent MQTT or HTTP)
- Build in debugging/logging from day one
- Version control everything with Git
Step 6: Cloud/Backend Setup
For MVPs, leverage managed services rather than building infrastructure:
- Data ingestion: AWS IoT Core, Azure IoT Hub, or Google Cloud IoT
- Database: Time-series databases like InfluxDB or TimescaleDB
- APIs: Serverless functions (AWS Lambda, Google Cloud Functions)
- Monitoring: Cloud-native dashboards or Grafana
Cost-saving tip: Many cloud providers offer free tiers sufficient for 100-1000 device MVPs.
Step 7: UI/Dashboard (Basic but Functional)
Your interface doesn’t need to be beautiful—it needs to prove value:
- Start with web dashboards (faster than mobile apps)
- Show real-time data and basic historical trends
- Include manual controls for testing
- Implement simple alerts (email/SMS)
Tools like Node-RED can create functional dashboards in hours, not weeks.
Step 8: Prototype Testing and Iteration
Plan for three iterations minimum:
- Alpha: Internal testing, debug obvious issues
- Beta: 5-10 friendly customers, gather feedback
- Pilot: 20-50 paying customers, validate business model
Document every failure. In IoT, a device that works in your office may fail in a metal warehouse or humid greenhouse.
The Role of Hardware, Software, and Cloud in MVP
Successful IoT MVP development requires strategic simplification across all three domains:
Hardware: Use development kits and breakout boards. Custom PCBs are for post-MVP phases.
Software: Leverage existing frameworks (Arduino, ESP-IDF, Zephyr RTOS). Write clean, modular code that can be refactored later.
Cloud: Start with managed services. You can migrate to self-hosted solutions when you have revenue and scale requirements.
Understanding the distinct IoT hardware vs software vs cloud roles helps you make trade-offs. For example, processing data on the edge (hardware) might reduce cloud costs but increase firmware complexity.
Common Mistakes in IoT MVP Development
1. Overengineering
Building for 100,000 users when you have 10. Start with SQLite, not Kubernetes. Use REST APIs, not custom protocols.
2. Ignoring Scalability
While you shouldn’t overengineer, completely ignoring scale creates dead-ends. Design data schemas and APIs as if you’ll need to support 10x growth.
3. Poor Hardware Decisions
- Choosing components with 6-month lead times
- Selecting chips without long-term manufacturer support
- Ignoring power requirements for battery-operated devices
4. Lack of Real-World Testing
Lab conditions lie. Test in actual customer environments with real network conditions, physical interference, and user behavior.
5. Security as an Afterthought
Unsecured IoT MVPs become botnet targets. Implement basic authentication, encrypted communications, and secure boot from the start.
Best Practices for IoT MVP Success
Use Off-the-Shelf Components
- Adafruit and SparkFun modules for rapid prototyping
- Pre-certified cellular modules (avoid certification delays)
- Standard enclosures (3D print only when necessary)
Embrace Rapid Prototyping Tools
- Node-RED: Visual programming for IoT workflows
- Blynk: Quick mobile app creation for IoT
- ThingsBoard: Open-source IoT platform with visualization
Agile Development for Hardware
Apply software agility to hardware:
- Sprint-based development cycles
- Continuous integration for firmware
- Hardware-in-the-loop testing
Build a Feedback Loop
Instrument your MVP to tell you about itself:
- Device health monitoring
- Usage analytics
- Automatic error reporting
From MVP to Scalable Product
The transition from MVP to production is where many startups stumble. Your prototype proved the concept; now you need to industrialize.
Review the IoT product lifecycle to understand this evolution:
- Design for Manufacturing (DFM): Optimize your hardware for production
- Supply Chain Setup: Secure component suppliers and manufacturers
- Certification: FCC, CE, UL depending on your market
- Cloud Scaling: Move from shared to dedicated infrastructure
- OTA Infrastructure: Deploy robust over-the-air update systems
The architecture decisions in your MVP should make this transition possible, not painful.
Conclusion: Your Roadmap to IoT Success
IoT MVP development is the disciplined art of proving value with minimal resources. It’s not about building something cheap—it’s about building the right thing efficiently.
Success requires balancing technical execution with business validation. Use off-the-shelf components, focus on one core feature, and test in the real world. Most importantly, view your MVP not as a product, but as a learning tool that happens to be functional.
Ready to move beyond MVP? Explore our complete IoT product development roadmap to plan your journey from prototype to scalable deployment.
Frequently Asked Questions (FAQ)
What is an IoT MVP?
An IoT MVP (Minimum Viable Product) is a functional prototype with the minimum features needed to validate your core value proposition with early customers. It includes working hardware, firmware, cloud connectivity, and a basic user interface—just enough to prove your concept works and customers will pay for it.
How long does it take to build an IoT MVP?
Typically 3-6 months for a team of 2-4 people. Simple WiFi-connected sensors can reach MVP in 8-12 weeks, while complex industrial systems may require 6-9 months. Using off-the-shelf components and existing cloud platforms significantly accelerates timelines compared to custom hardware development.
What hardware is best for IoT MVP?
The ESP32 is the current gold standard for WiFi-enabled MVPs due to its low cost ($5-10), built-in wireless, and strong community support. For battery-operated devices, consider the ESP32-S2 or Nordic nRF52 series. Avoid custom PCB design in the MVP phase—use development boards and modules instead.
How much does an IoT MVP cost?
Budget $15,000-$50,000 for a typical IoT MVP, broken down as:
- Hardware/components: $2,000-$5,000
- Cloud infrastructure: $500-$2,000 (often free tier eligible)
- Development time: $10,000-$40,000 (depending on team location and size)
- Testing/certification prep: $2,000-$5,000
Can I scale directly from MVP?
Not directly—you need a transition phase. MVPs use development hardware unsuitable for mass production. Plan for a “production prototype” phase where you redesign for manufacturing, secure component supply chains, and obtain necessary certifications before scaling to thousands of units.
Should I build mobile or web dashboard for my MVP?
Start with a web dashboard. It’s faster to develop, works across all devices, and easier to update. Build a mobile app only after validating core value through the web interface, unless mobile-specific features (like Bluetooth pairing) are essential to your product.